
From Podcast to Publishable Shorts
How to Reframe a Podcast Interview for Vertical Video
Reframe a podcast interview for vertical video. Compare real 16:9 and 9:16 clips, choose full frame or subject following, and check faces and captions.
A landscape interview can look fine until you put it inside a vertical frame. The guest becomes larger, but the host disappears. A camera cut changes who is visible. Captions that fit below a wide shot now cover a face. To turn a podcast interview into a vertical clip for Shorts or Reels, choose a crop that keeps the conversation easy to follow. This guide compares the options in ClipPrism using the same excerpt in 16:9 and 9:16.
Choose what the viewer needs to see, then choose the framing. Use Keep full frame when the relationship between people or objects matters. Try Follow subject when a closer view supports the answer, and inspect the result across the whole clip.
1. Decide what the crop must preserve
Start with the original frame. Is the speaker alone? Does the host’s reaction explain the tone? Is the guest pointing at a product or sharing a screen? A face is not always the only important subject.
Our example uses the roughly 24-second question-and-answer excerpt from The Build Log. The landscape export below preserves the source composition. Watch how the composition changes from the host’s question to the guest’s answer, then compare the vertical edit below.
Landscape reference: reviewed 16:9 interview excerpt
Vertical comparison: captioned 9:16 version, about 24 seconds
The vertical version makes each speaker more prominent. It also removes more of the surrounding scene, and the host’s long opening caption occupies three lines. Read the caption at normal speed on a phone. If it is hard to follow, adjust the line breaks or split it into shorter timed phrases while keeping the spoken words intact. Compare how much easier the face is to see with how much room remains for text.
| Choice | What it preserves | What to inspect |
|---|---|---|
| Keep full frame | The complete source image, with a blurred background filling the vertical canvas. | People and details become smaller. Check whether faces and important details remain clear on a phone. |
| Follow subject | A closer composition focused on the selected subject. | The crop can exclude other people, gestures, or important content. Check subject choices and transitions. |
Choose full frame when the cost of losing context is greater than the benefit of a larger face. A closer view works for this question and answer only if you can still follow the exchange without the wider scene. Keep reactions or gestures that help explain what is being said.
2. Set the output before judging the composition
- Open the clip in Reframe. Finish and save range changes before generating subject suggestions.
- In Preview, open Change output, select Fixed 9:16, and apply the output choice.
- Compare the full-frame preview with your source. Then select Follow subject if a closer composition fits the content.
- Read the dialog before choosing Apply and save. This generates or applies the framing, saves it, and refreshes the preview. Review and adjust afterward.
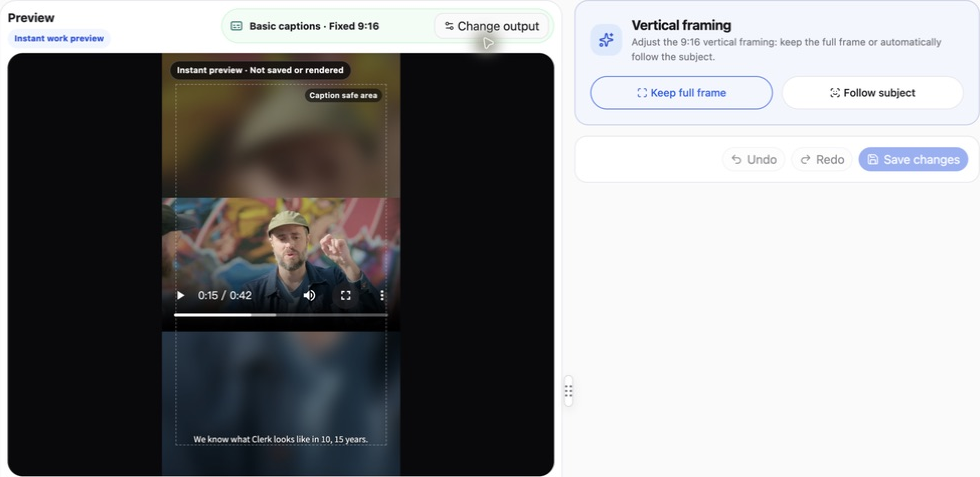
Read any warning about other unsaved edits before confirming. If the range has changed, return to save it first. You want the framing analysis and the words you intend to publish to refer to the same selection.
3. Inspect every speaker change, not only the first frame
The framing panel offers controls for subject, shot size, switching, and what happens when the subject is lost. These choices need to match the recording. A two-person conversation asks a different question from a single-speaker explanation: does the viewer need the current speaker alone, or the exchange between both people?
In this example, analysis identified shots with multiple possible subjects and weak speaker evidence. Start with those shots and check that the crop follows the person who is speaking.
- Use Locate on a listed shot and play through the transition.
- Check the person and the visible content. When needed, use the offered person choices or a shot-level Keep full frame treatment.
- Compare the correction with the neighboring shots so the frame does not jump unnecessarily.
- Apply the shot adjustments to the draft when prompted, save the changes, and refresh the final preview.
After accepting suggestions, replay the transitions. Analysis warnings can remain visible after a shot has been reviewed; use the footage to judge whether the framing works. When a close-up leaves out part of the exchange, try keeping the full shot.
4. Watch for movement and caption collisions
Play the entire selection at normal speed. Look for clipped foreheads, hands entering and leaving the crop, rapid changes in scale, or framing that follows a background person. Pause at the beginning and end of each source-camera cut, then replay it in motion. Still images reveal composition; playback reveals distracting movement.
Use Protect caption safe area when arranging the crop, then read the captions in the vertical result. A safe-area guide cannot decide whether a particular line hides a gesture or makes the face too small. The longer opening question in this example is especially worth inspecting.
If captions need changes, use the caption review workflow and check the composition again afterward. Do not shrink the text until it is unreadable merely to make a close crop fit.
5. Review the rendered version you will share
The instant work preview helps you make decisions, but it is not the final rendered file. After saving, let the final preview finish and play it. If the final preview fails, follow the retry action and wait for a playable result before downloading.
Open the downloaded MP4 and confirm that it is the intended 9:16 version, with the expected captions and audio. Review it at phone size, including the first frame, the host-to-guest transition, and the final words. When previewing a post on your publishing platform, check that its interface does not cover essential text.
A vertical clip is ready when the content still makes sense, the relevant subject remains visible, and the actual file matches the decisions you reviewed. If the tighter version loses too much, full frame remains a useful choice. Check available output formats and plan access before planning a batch.
Try one landscape interview in a vertical frame
For a processed recording, choose Review clips in Recent videos, select a short question and answer, and open Reframe. Compare full frame with subject following, then check faces, cuts, and captions through the whole clip.
Reframe a clip in ClipPrismUse a recording you own or have permission to edit and share. Compare plans and available features.