
From Podcast to Publishable Shorts
How to Fix Auto-Generated Captions Before Publishing Shorts
Fix auto-generated podcast captions in ClipPrism. Correct names with Professional terms, reuse an Account glossary, and check timing and readability.
The speaker sounds clear, yet the captions turn a company name into an ordinary word. Or the words are correct but a long line disappears before you finish reading. For podcast and interview creators, these are different problems—and fixing one does not fix the other.
Review captions in three passes: meaning and names, timing, then readability in the chosen frame. Save the changes and check the actual MP4 before you share it.
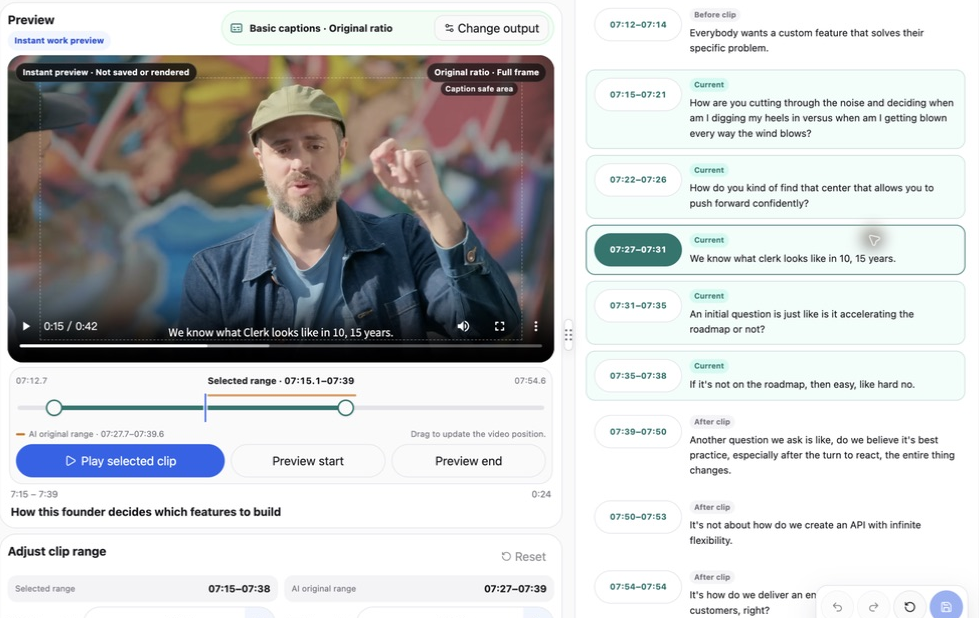
Our example shows a common issue in technical interviews: proper-name capitalization. The source transcript uses clerk and react; the corrected captions use Clerk and React.
1. Check the words a spellchecker cannot decide for you
Start with people, organizations, product names, specialist terms, numbers, and negations. A plausible word can still identify the wrong thing. An omitted “not” can reverse a claim while leaving a perfectly grammatical sentence.
In our example from The Build Log, guest Colin Sidoti discusses his company, Clerk, and later mentions React. The original transcript lowercases both. Listening helps establish what is said; the recording’s title and the surrounding technical discussion help establish the intended proper names. Do not replace an unfamiliar term solely because a more familiar one looks right.
| Original transcript | Reviewed caption | Why change it? |
|---|---|---|
| what clerk looks like | what Clerk looks like | The speaker names the company. |
| the turn to react | the turn to React | The surrounding discussion refers to the technology. |
For your own episode, keep a short reference list supplied by the host or guest: names, brands, and recurring terms. Verify each relevant occurrence. Search for repeated occurrences so a name stays consistent throughout the clip.
2. Edit the captions that appear in the video
Open the candidate in Refine. The Transcript tab shows read-only source context; the Captions tab contains the text shown in the exported video. This distinction matters when the source transcript still displays an old spelling after you have corrected the captions.
- Settle the clip’s range first, so you are reviewing the words that will actually be included.
- Select Captions and find the line containing the term. Use Find in this video… to help locate text, then listen to the relevant passage.
- Correct the text in that caption line. Keep the speaker’s meaning and level of certainty.
- Play the line with the neighboring lines before you save.
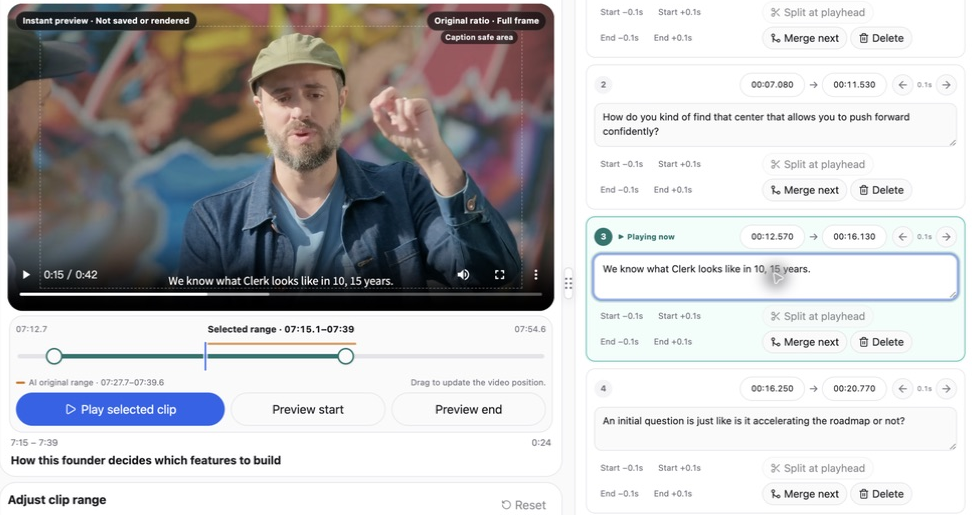
Preserve phrases that qualify the answer: “an initial question” means something different from “the only question.” A post title can summarize an idea; captions represent the speech. If a word is genuinely unclear, return to the audio or ask the speaker instead of silently guessing.
3. Use Professional terms for a correction; Account glossary for recurring vocabulary
A single typo can be edited directly in its caption line. When a name or technical term repeats, open Professional terms in the caption toolbar. Enter the observed spelling in Find text and the verified spelling in Replacement, then choose Preview suggestions. For a caption that still contains the original lowercase term, an example pair is clerk → Clerk.
Read the Original and Suggestion differences. Select only the changes that fit the spoken context, then use Apply selected · Don’t save. That updates the unsaved draft. Finish by choosing Save changes and refreshing the final preview. If the caption is already corrected, there may be no matching change to apply. Professional terms finds matching text, so review each suggestion in context before applying it.
For vocabulary that recurs across recordings, Account glossary stores incorrect and preferred spellings for reuse. Choose Add term, enter the pair, and set the relevant category, video language, and case-matching option. Save the glossary, then use Preview for this video to inspect matching suggestions for the captions you are working on. The glossary is available with Standard.
Saving the glossary does not rewrite existing captions. Its matches generate reviewable suggestions, which still need to be selected, applied to the draft, and saved as caption changes. This is useful for recurring guest names, brands, and technical vocabulary without treating every occurrence as interchangeable. For example, an ordinary use of “react” should not automatically become the product name React.
For a recurring show, keep verified guest names, company names, and specialist vocabulary in the glossary. Use Professional terms for a correction specific to the current video. Both workflows let you review the matching lines before changing them.
4. Separate source time from caption time
The source range begins at 07:15.1 in the interview. In the edited clip, the line about Clerk begins at 00:12.570 and ends at 00:16.130. Caption timestamps count from the start of the selected clip. Use source time to locate the passage in the interview and caption time to align its text.
Use the line’s start and end fields or the small timing controls to align the text with the speech. Moving an entire line and moving only one boundary solve different problems: the first shifts the line; the second changes how long it remains visible. Listen around the adjustment so you do not create a collision with the neighboring caption.
Do not use a timing change to conceal missing words. To divide a long caption, pause at a natural phrase boundary and choose Split at playhead. Check the words and start and end times in both new captions, then replay the transition at normal speed. Keep names and closely related words together, and confirm that every spoken word is still represented.
5. Check captions in the frame you will publish
Read the clip once with sound off. Can you follow the thought at normal speed? Are names readable? Does the caption cover the speaker’s mouth or a relevant screen? A long host question may need more attention than the short answer, even when the wording is correct.
In Caption presentation, inspect the available presentation options and review the result in your chosen output ratio. A line that is comfortable in landscape can wrap into an awkward block in 9:16. Recheck it after changing the framing.
Use any caption-quality flags to find lines that need attention, then read and listen through the whole selection. Pay particular attention to unfamiliar names and dense explanations.
6. Save, refresh, and read the rendered captions
Choose Save changes, then Refresh final preview. After the preview is ready, review the clip and use Download MP4. Saving text and rendering text into the final video are separate steps; an instant preview is not the downloaded file.
Reviewed captioned example, about 45 seconds
Open the downloaded MP4 and check the corrected terms, the first caption, the final caption, and any dense line. If you change the wording or timing again, save and refresh again. Caption editing is available with Lite and Standard; consult the plan comparison for current access.
Correct one clip before preparing the whole episode
Once your recording is processed, choose Review clips in Recent videos and select a candidate. Open Refine, then Captions, to check names and terminology against the speech. Review the corrected export before sharing it.
Review captions in ClipPrismUse a recording you own or have permission to edit and share. Compare plans and available features.